

.jpg?width=300&name=Slide-1-copy-2%20(9).jpg)
If you’ve spent any time using Dataiku, you’ve experienced how easy it is to create a project thanks to its intuitive interface, visual recipes and orchestration engine. Dataiku greatly reduces the technical complexity required to accomplish advanced analytics tasks and therefore produces valuable business results more efficiently. In this article, we explore Dataiku scenarios which allow you to easily automate a wide variety of tasks and prepare your project for unattended execution in your production environment. This automation can provide the regularity and consistency needed for a successful data project.
Why Dataiku Scenarios?
In Dataiku, scenarios are an extremely flexible feature that allows you to automate a series of data preparation and analysis steps into a single workflow. This workflow might be something you want to run nightly, weekly, monthly, or based on a custom event. Scenarios can be set up to run in your Dataiku design node (likely your development environment) or enabled on an automation node (often your production environment). The most common use of scenarios is to execute the steps in a project flow to rebuild datasets or perform machine learning scoring. In this article, we’re going to work with a project that has a number of preparation steps as well as an ML model and scoring node, which we’d like to run on a daily basis.
Downloading the Starter Project
The project that we’ll be using can be downloaded from the Snow Fox Data Github site. After downloading the "discovery-training-complete.zip" file, you can import it as a project in your Dataiku design node and get started using the steps below.
Project Background
If you’ve participated in a Dataiku Discovery Training session in the past, this project may look familiar to you. It is the completed project for that training session which explains the progression of preparing, joining, modeling, and scoring data from datasets containing credit card information.
Creating a Scenario
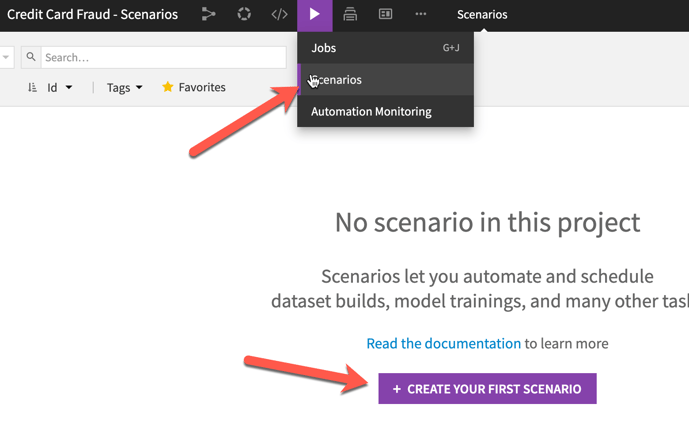
After importing the starter project, we begin creating a scenario by selecting the Scenarios option under the play icon in the DSS top navigation. This screen lists all scenarios created for this project. Just like analysis and notebooks, you could have an unlimited number, each with a distinct purpose. On this screen, select the Create your first scenario button to start the process.
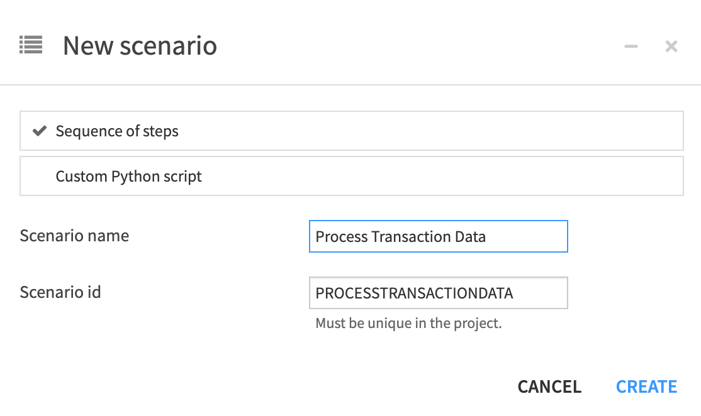
When you create a scenario, you have the option of a Sequence of steps or Custom Python script. We will be focusing on the Sequence of steps option, but be aware that (like in many other areas of Dataiku) a scenario can be defined entirely with Python code, allowing for maximum flexibility. Of course, this flexibility comes with a tradeoff of being a bit more difficult to maintain as it would not come with a visual user interface.
As shown in the screenshot below, let’s select Sequence of steps and give the scenario a name: “Process Transaction Data”. Similar to when a new project is created, Dataiku will auto-generate a "Scenario ID" based on the name we’ve provided, which will be a unique identifier for this scenario within our project.
Configuring the Scenario
Generally, the creation of a scenario consists of 4 parts:
- Defining the scenario steps. This includes all of the functionality that we’d like to automate as part of this scenario definition.
- Setting up the scenario triggers. These are all of the events that would trigger the scenario to start running, such as a specific schedule or the changing of a dataset.
- Configuring the scenario reporters. Reporters are used to send out notifications either before or after a scenario has run. The reporter might send out error messages or a summary of the data processed within the run.
- Enabling the scenario to run automatically. Even after configuring triggers on a scenario, it’s still necessary to enable that scenario to allow automated execution within an environment. You might, for example, define and test a scenario on your Dataiku design node but leave that scenario disabled. Once you publish your project to an automation node in a production environment, you might then enable the scenario to run on a schedule in that environment.
For this example, we’re going to get started in the “Steps” tab to define the actions we want to take in our scenario. This allows us to define any number of steps that will execute sequentially as the actions in our scenario. Steps are added to a scenario by clicking the Add Step button in the lower left-hand corner of the screen. In the pop-up list, you’ll notice that there are many step options. Listed below are a few of the most common steps that can be added to your scenario. You’ll find a more detailed description of these steps in the Dataiku documentation.
- Build / Train: Builds either a model, dataset, folder, or evaluation store. Specific to the dataset build, you can configure whether the step should build a single dataset or recursively build upstream datasets.
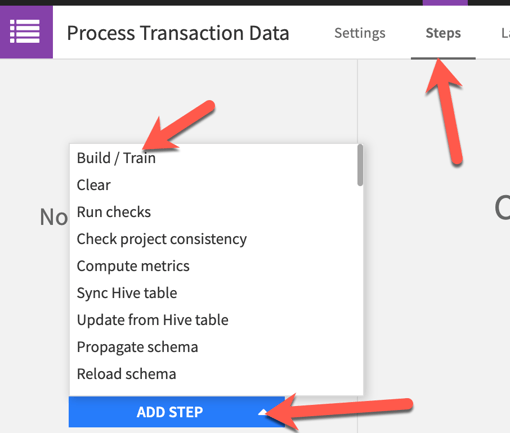
- Clear: Clears the underlying data out of a dataset. This is a very nice option for saving on storage space if you have a number of “intermediate” datasets that you can purge after a scenario execution.
- Run checks / Runs all defined checks on a specific dataset: If any of the checks fail, this scenario step will also fail by default.
- Execute SQL: Executes arbitrary SQL statements, allowing you to - for example - query or update a table as part of the scenario execution.
- Execute Python Code: As in so many places in Dataiku, Python code can be embedded in a scenario step for execution. This allows for great flexibility as you could perform nearly any operation using the Dataiku API from a Python step.
- Define Scenario Variables / Set Project Variables / Set DSS Global Variables: These steps are all very useful for the purpose of checking and modifying variables for use in your project execution. These variables can be used for tasks such as recording the last processed record (think incremental processing) or storing computed values.
- Run another Scenario: This can be a very useful step to trigger the run of another scenario at any specific point within your scenario execution. This scenario could be one in the same project, or even from another project that you have access to.
Creating a Simple Scenario
For our example, we’re going to be creating a relatively simple scenario that performs the following steps:
- Build the project’s flow up to the split recipe, which will populate the data for the transactions_known and transactions_unknown datasets which are used in the next steps to train a machine learning model.
- Re-train our model based on this newly processed data.
- Re-score the transactions_unknown dataset by building the score dataset.
Step 1: Build/Train
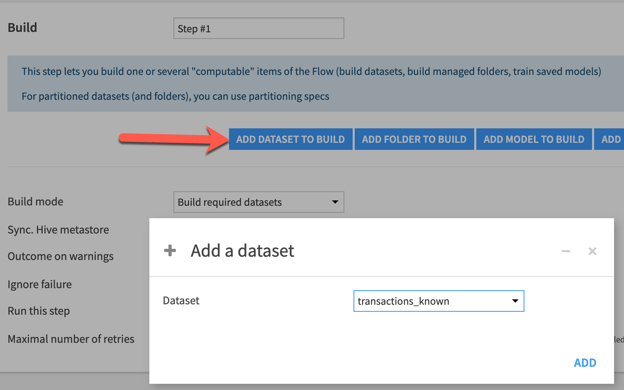
Let’s get started by adding a “Build/Train” step to our scenario. As you’ll see in the figure below, this is accomplished by selecting the Add Dataset to Build option and choosing our dataset. In our example project, I’m going to select the transactions_known dataset, which is the input to our prediction model.

You’ll notice that it is possible to add more than one dataset to build in this step. For example, if you had multiple flow paths that you would like to build, you could add datasets from each, and (if possible) Dataiku will build them in parallel (as compared to serial/sequential). This is potentially much more efficient than adding the additional dataset builds as subsequent scenario steps since the scenario steps are executed sequentially (top steps would need to finish before the next step will start).
Another very important topic to understand in a build scenario step is the “Build mode” as highlighted in the figure below. 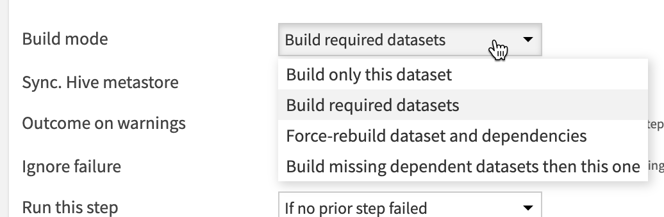
The build mode has 4 options, each producing very different results:
- Build only this dataset. As its name implies, this option will build only the selected dataset, without affecting the rest of the flow.
- Build required datasets. This is a very powerful yet tricky option, which is similar to the “smart recursion” feature in DSS flow builds. With this option, Dataiku will determine which upstream datasets it thinks are necessary to rebuild and then rebuild all recipes/datasets between the selected set and any upstream sets requiring rebuild. This is typically a great option but requires significant testing to verify that Dataiku will compute the upstream requirements in the way you hope.
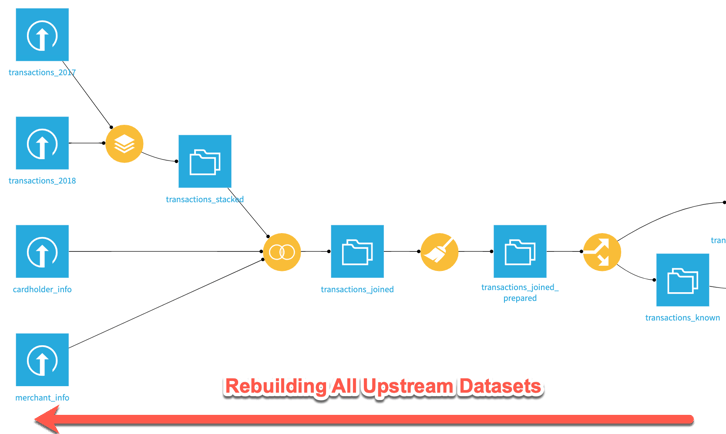
- Force-rebuild dataset and dependencies. With this option, Dataiku will rebuild all upstream datasets. If you know that you do want to rebuild everything upstream from a target dataset, this is likely the best option since it takes any ambiguity out of what the scenario step is expected to perform.
- Build missing dependent datasets then this one. This is a much less common option which allows for the build of any missing data (only) prior to re-building of the selected dataset.
For our example, let’s set this build mode to “Force-rebuild” which will cause the step to create a job which will rebuild all of the upstream datasets as shown in the figure below.
The next step that we will take in our scenario is to add a step to re-train our machine-learning model with the new data we’ve just processed in the previous step.
Step 2: Retrain
Now that we’ve created a step to rebuild a portion of our project flow, let’s create a second step to re-train the model deployed to the flow on this new data. This step will be very similar to the previous “build” step. To get started, we’ll choose the same Add Step => Build / Train option as we selected previously. In this new step, rather than selecting the Add Dataset to Build button, we’re going to choose the Add Model to Build option. You’ll see that this selection will open a prompt to allow us to select our previously deployed model.
In the left-hand pane, you’ll see that, like a preparation recipe, this new step appears below the first step we created. Recall the steps in the scenario are executed sequentially from top to bottom. With the following step configuration options, it’s also possible to specify how to handle a failure at any step:

For example, we may want to execute certain steps with every scenario execution, regardless of whether a previous step had failed.
Step 3: Scoring Data
With the initial build and retrain steps complete, the last step we’re going to add to our scenario is a final build step which will use our freshly retrained model to score an unknown dataset. As in the previous steps, this is done with the Add Step => Build / Train option. In this case, we’ll be adding the transactions_unknown_scored dataset as the target of the build.
Triggers
Now that we’ve set up the steps that define the actions that will be performed by our scenario, let’s jump back to the “Settings” tab where we’ll find the Triggers and Reporter settings. Triggers are set up on a scenario to define when the steps will start, which could be based on a variety of events. The most common types of scenario triggers are:
- Time-based. A very common request is to run a scenario on a time schedule such as nightly, weekly, or monthly. With a time-based trigger, this is easy to define - and it’s even possible to set up more complex schedules such as “the 2nd Wednesday of every month”.
- Trigger on SQL query change. This is a trigger type that works for SQL-based datasets and functions by running a query on that dataset and activating when the output of the query changes. A common use case of this trigger type might be “SELECT max(date) from XXX” if you wanted to trigger a scenario to run if the maximum date in a table had been updated.
- Trigger after scenario. The two previous trigger types are kicked off based on an external event, but this scenario is different in that it is started when another scenario has completed. This “other” scenario could be within the same project, or from another project that you have access to - making it a very flexible way to chain the build of project flows.
- Custom trigger. Similar to the “Custom Python Script” option for creating scenarios we defined above, the custom trigger option allows us to define triggering events using Python which allow for a great deal of flexibility.
In our demo project, we’re going to define a time-based trigger to kick off our scenario steps execution nightly at midnight as shown in the screenshot below. You’ll also notice that a trigger can easily be disabled so the configuration can be saved but not enabled for execution.
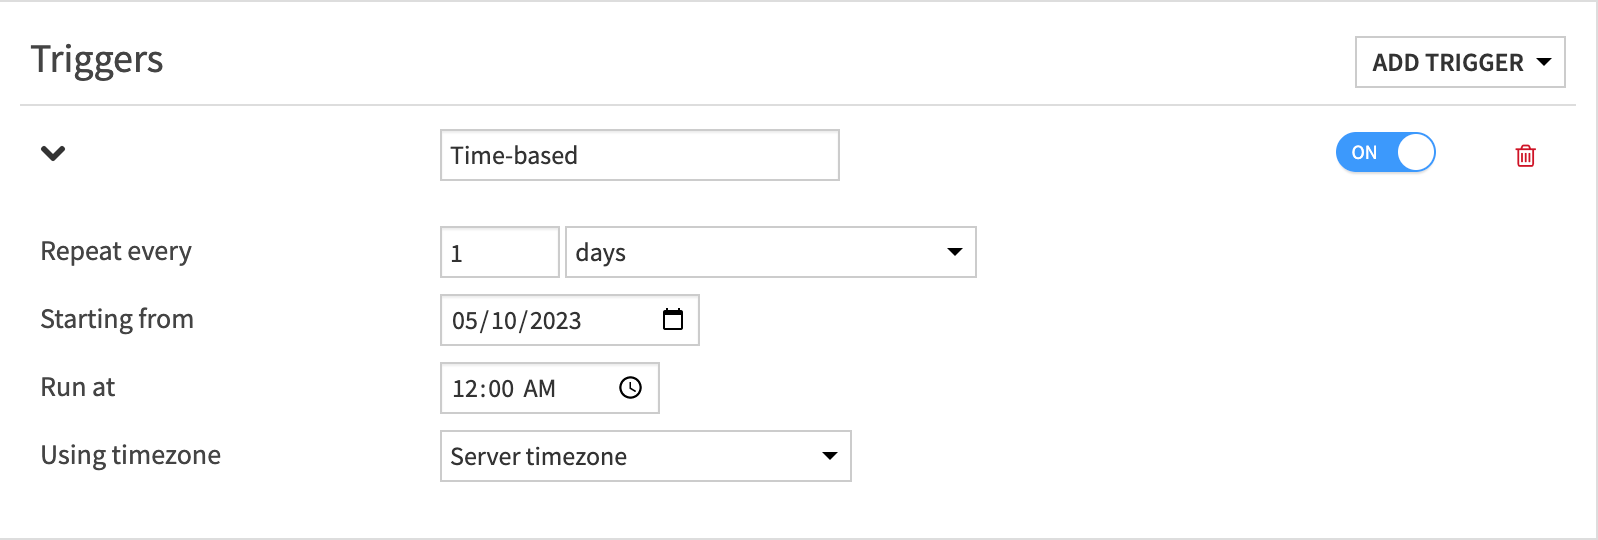
For our demonstration, we’ve added a single trigger, but it’s feasible to add multiple triggers to any scenario which could define multiple events to kick-off execution.
Enabling the Trigger
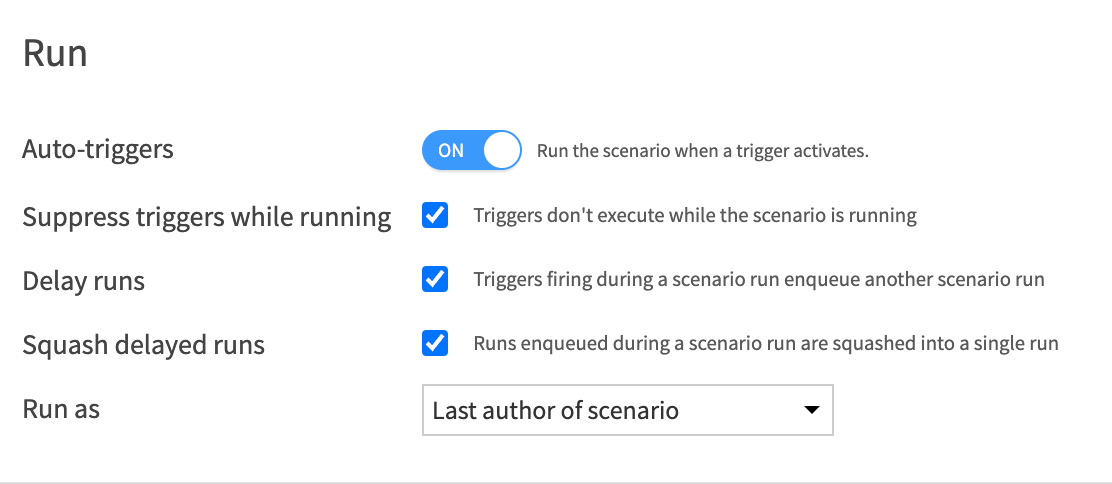
Although we have configured and enabled a scheduled trigger on our scenario, there’s one additional step that must be taken to allow the trigger to execute. In the topmost section of this "Settings" tab, you’ll see an Auto-triggers toggle under the "Run" header. By enabling this toggle, the scenario triggers will be executed in the Dataiku environment that is hosting the Dataiku project.
Reporters
To this point, we’ve covered the topics of scenario steps and triggers which are the majority of what we’d typically need to set up our Dataiku flow for automated execution. The last element that we’re going to cover is focused on delivering and communicating the results of these scenario runs. One of the key components to the success of data science projects is the ability to monitor status and receive notification of failures - and that’s the role of scenario reporters.
Adding a Reporter
Adding a reporter is done in a very similar manner to the trigger that we added in the previous section. In the case of the reporter, we have a number of options for the delivery channel including Mail, Slack, Microsoft Teams, and Twilio. In order to use these channels, it’s necessary to have an administrator set them up for your organization.
The technical configuration of these notification channels is beyond the scope of this article, but you can see the reporter options by selecting the Add Reporter button as shown in the screenshot below. More information on each of the reporter types can be found in the Dataiku documentation.
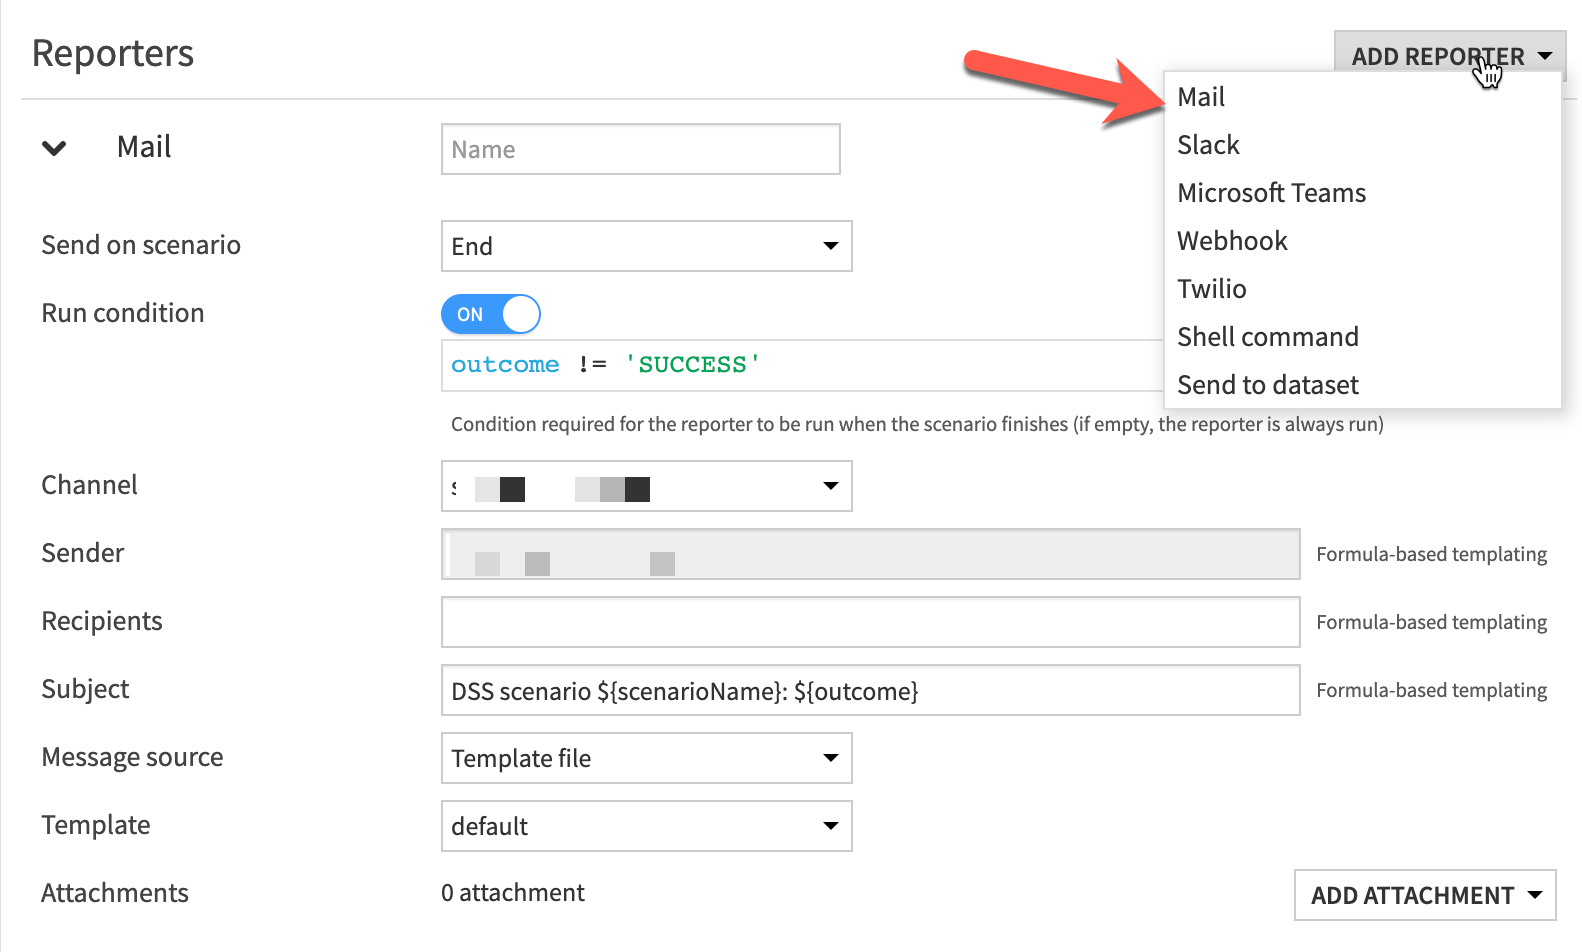
Generally, after adding a reporter to your scenario, there are some common options for any of the reporter types:
- Send on scenario: Specifies whether the reporter will fire before or after the scenario steps execute. “End” is the most common, but it can also be very handy to choose “Start” to notify when a scenario execution has kicked off.
- Run Condition: When toggled on, the run condition determines whether the reporter should conditionally send results. In the screenshot above, you’ll see the “outcome != ‘SUCCESS’” condition which indicates that the reporter will only send a message if the scenario encountered an error.
- Channel: In order for a reporter to function, a communication channel must be specified, which could be email, messenger, or a more custom output. This channel needs to be set up at a Dataiku instance level by an administrator.
Easy Automation with Dataiku Scenarios
Consisting of steps, triggers, and reporters, scenarios make it easy to automate end-to-end data workflows and pipelines within Dataiku projects. As you’re looking to move your Dataiku projects from development into production, scenarios are an essential component that allows for scheduled execution and complex orchestration in your team’s environment.
Are you using scenarios to automate your flows? If you need some help getting started, Snow Fox Data has a team of experts ready to guide you to the next step in your data journey.