


In part one of our Dataiku and Snowflake blog series, we learned about the ever-expanding number of organizations that are finding that the combination of Snowflake and Dataiku provides a foundation for one of the most flexible and dynamic platforms in the data science and analytics market today. Together these tools create an exceptionally scalable engine for processing, analyzing, and sharing data. This article covers an additional method for optimizing Snowflake execution from your Dataiku platform in order to maximize compute and team efficiency and prepare your projects for successful productionalization.
Advanced Efficiency Through SQL Pipelines
In the first part of this blog series, we covered a few great opportunities to optimize these two technologies including pushdown computation and the efficient use of connections. In this article, we illustrate another more advanced efficiency optimization: SQL Pipelines.
Using Dataiku's SQL Pipeline Feature
In the last article, we saw how push-down compute can be used to translate Dataiku recipe operations into SQL queries, allowing us to take advantage of the tremendous computational power of Snowflake and reduce data movement. Regardless of which engine we choose, the output data generated by any recipe will always be written to the destination table - which in a big flow may result in many individual “intermediate” datasets (at least one per recipe) in order to produce a final, consumable result. By utilizing the Dataiku SQL Pipeline feature, it’s possible to combine multiple recipes together into a single, larger query execution which will avoid the writing of the intermediate datasets and potentially provide a much more efficient transformation flow.
To get a clear understanding of what we’re aiming to accomplish with a SQL Pipeline, let’s take a look at the Dataiku flow in the figure below. This flow has three recipes, each of which are reading and writing to Snowflake datasets and are configured to use the “In-database (SQL)” recipe engine.
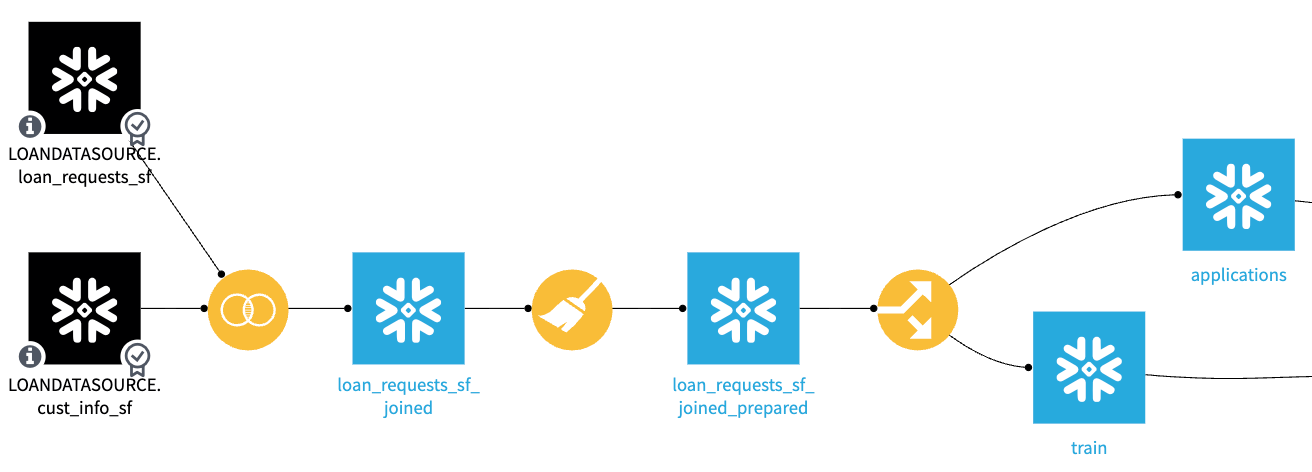
The in-database engine will effectively convert the visual recipes’ logic to SQL queries and send these queries to the Snowflake database for execution. If we look at the job logs generated as a result of the execution of these recipes, we’ll see a single statement per recipe that reads from the input(s), applies the recipe logic, and then writes to the output dataset(s) as illustrated below in the join recipe:
INSERT INTO "LOAN_REQUESTS_SF_JOINED"
SELECT
"loan_requests_sf"."id" AS "id",
"loan_requests_sf"."Amount_Requested" AS "Amount_Requested",
…
"cust_info_sf"."Status" AS "Status"
FROM "LOANDATASOURCE_LOAN_REQUESTS_SF" "loan_requests_sf"
LEFT JOIN "LOANDATASOURCE_CUST_INFO_SF" "cust_info_sf" <---- JOIN converted to SQL
ON "loan_requests_sf"."id" = "cust_info_sf"."id"
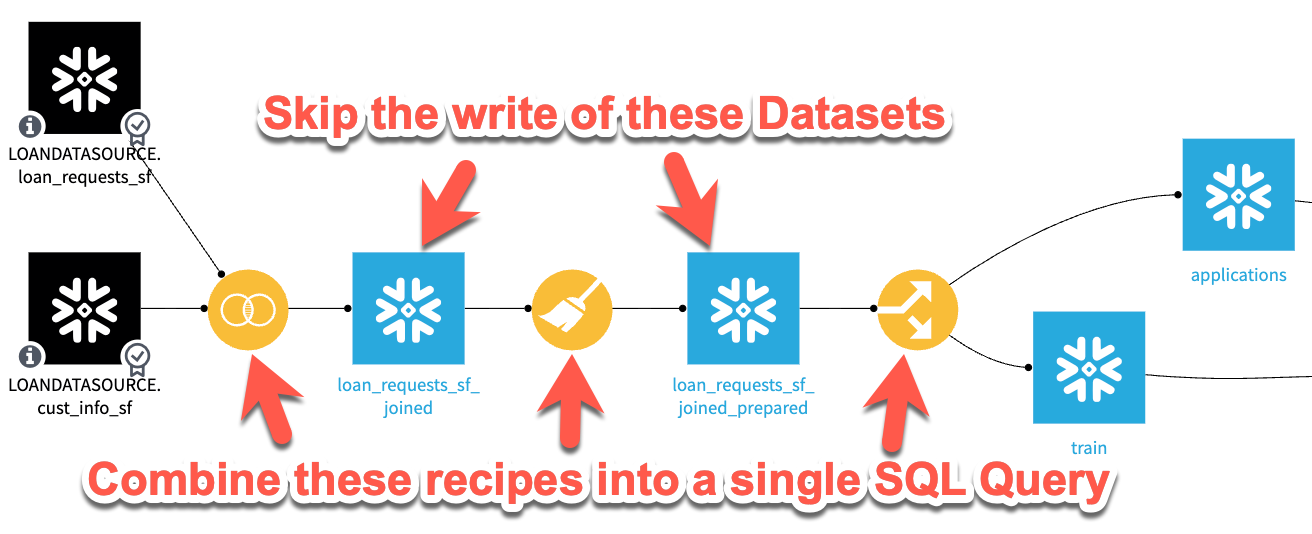
As discussed, this recipe execution is very efficient since it minimizes any data movement (it never leaves Snowflake) and it takes advantage of the scalability and efficiency of the Snowflake query engine, but it does still require data to be written (possibly unnecessarily) to each intermediate dataset in our flow. What we’ll aim to accomplish with SQL pipelines is illustrated in the screenshot below. By combining these recipe steps, we’ll avoid writing data to the intermediate datasets altogether, which should save execution time and potentially storage costs.
 Pros and Cons of SQL Pipelines
Before we look at how to set up data pipelines, let’s list some of the pros and cons of their use.
Pros of SQL Pipelines
- Great for reducing processing time in large/long flows where all steps are being performed in-database. As an example, Snow Fox Data has seen project scenario execution times reduced from 90 minutes to 30 minutes by simply using SQL pipelines. When put in terms of Snowflake warehouse utilization, this could be a significant cost savings.
- If the intermediate datasets are never written (or written and subsequently cleared) the use of SQL pipelines will reduce the amount of data stored in the intermediate sets and therefore reduce overall project storage costs. Depending on the size of the data in a project, this could translate to a significant amount of storage reduction.
Cons of SQL Pipelines
- As we’ll see in the next section, setting up SQL pipelines does take some project configuration which must be maintained as your project evolves.
- If you have recipes that are not using the in-database processing engine (Python steps for example), a SQL pipeline will not be able to include that recipe.
- Failed jobs that occur within a SQL pipeline are much more difficult to troubleshoot than those that occur in a standard recipe job activity.
Pro Tip: Due to the potential debugging challenges related to SQL Pipelines, Snow Fox Data typically recommends implementation when a project has heavy engineering requirements (long flows) and is in the stage of “production process optimization” and not typically when in the early stages of development.
Setting up the SQL Pipeline
Now let’s look at the steps necessary to configure a project and flow. As you’re working in Dataiku, it’s necessary to remember that enabling SQL pipelines is not done at a “global” level but instead must be configured for each dataset on every project. Thankfully, it’s relatively easy to switch this feature on and off as needed.
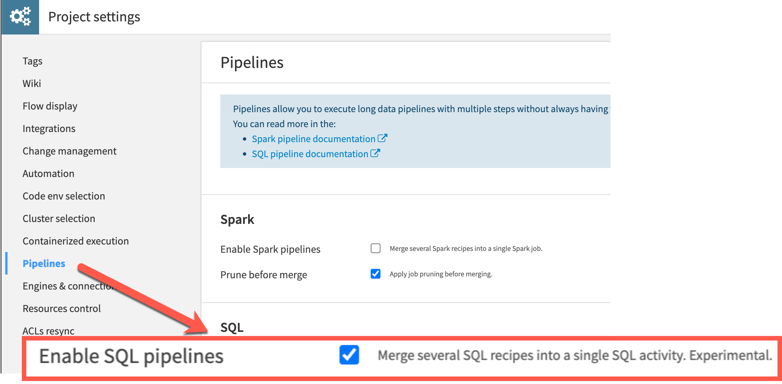
The first step necessary to enable SQL pipelines is an option that must be enabled at the project level. This option can be found under "Project Settings" in the "Pipelines" section. Enabling pipelines at the project level however does not immediately cause the entire project to utilize pipelines, the feature still needs to be enabled at a per-dataset level.
Although this feature is described as “experimental”, the team at Snow Fox Data has been part of multiple implementations making use of SQL pipelines and found it to be a stable feature.
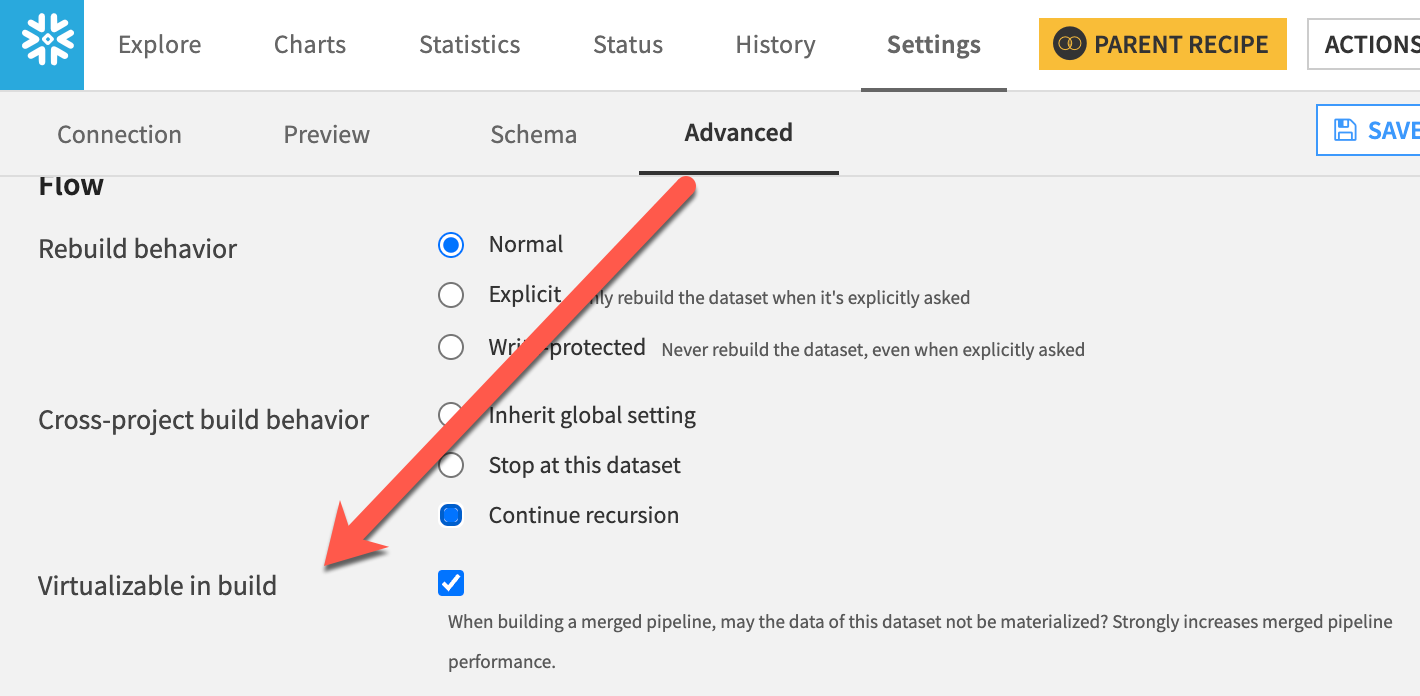
Once we have the project set up to allow for SQL pipelines, the next step is to configure each dataset that we’d like to participate in pipelines as “virtualizable”. This setting tells Dataiku that the dataset is available to be included in a pipeline activity when the execution of jobs is being planned. The "Virtualizable" setting can be found per dataset by scrolling to the bottom of the "Settings" in the "Advanced" section.
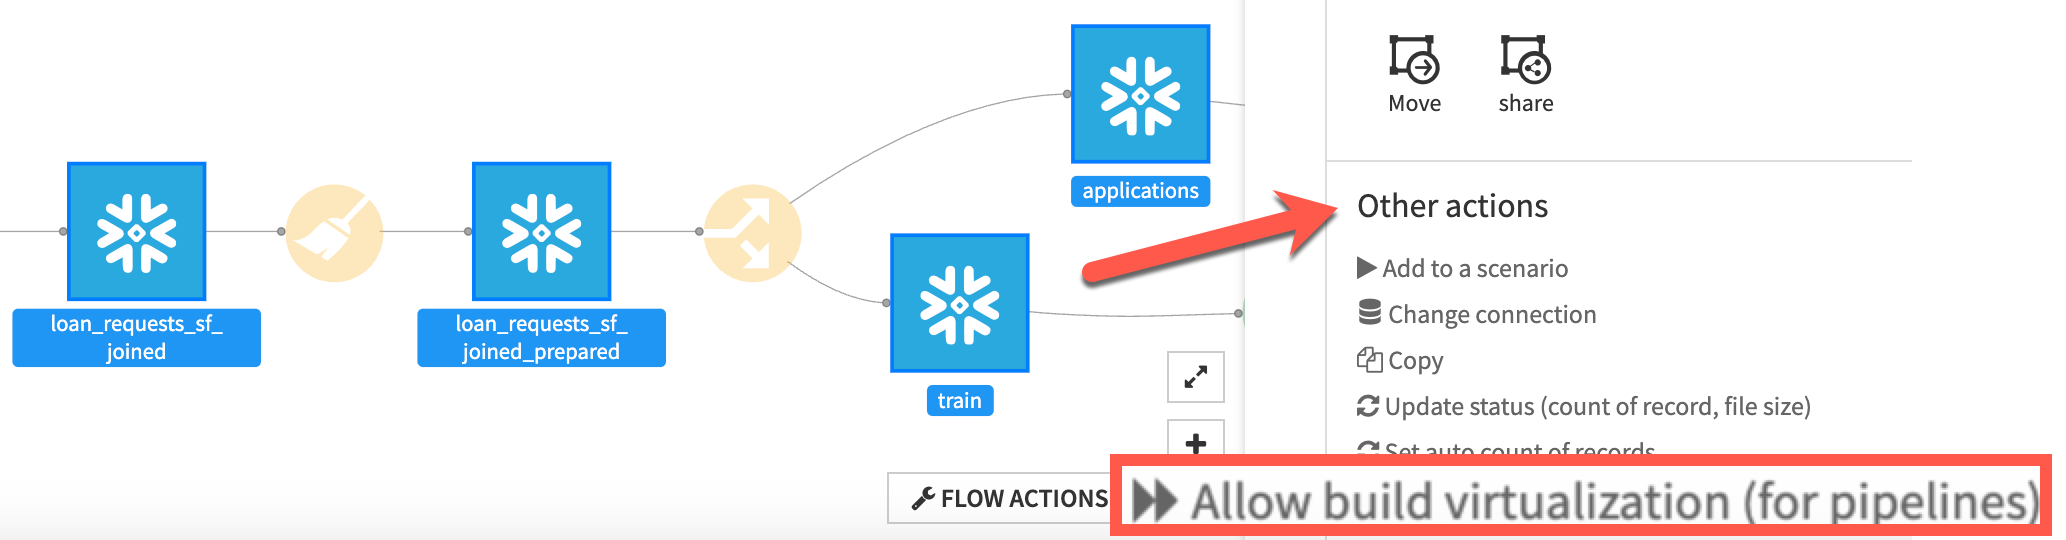
For a large flow, having to check the box for each dataset might seem like a laborious task. Thankfully, there is a much faster method to set this property on multiple datasets using the flow actions menu. By selecting more than one dataset in your flow, you’ll find an option called Allow build virtualization which will toggle the virtualizable property on each of the selected datasets - a much quicker method than the "Advanced" steps we previously covered.
Running the SQL Pipeline
Once we have our desired datasets configured to allow for virtualization, we are ready to perform our first pipeline test. In order to take advantage of the SQL pipeline in our flow, it’s necessary to run using a method that will execute multiple recipes in a single job (building a single dataset won’t take advantage of this feature). This can be accomplished in multiple ways, one of which is by selecting the furthest downstream dataset and selecting Build, Recursive, then Forced recursive rebuild. The following screenshot shows the preview of this job which contains a single SQL pipeline step encapsulating the three recipes in this section of the flow.
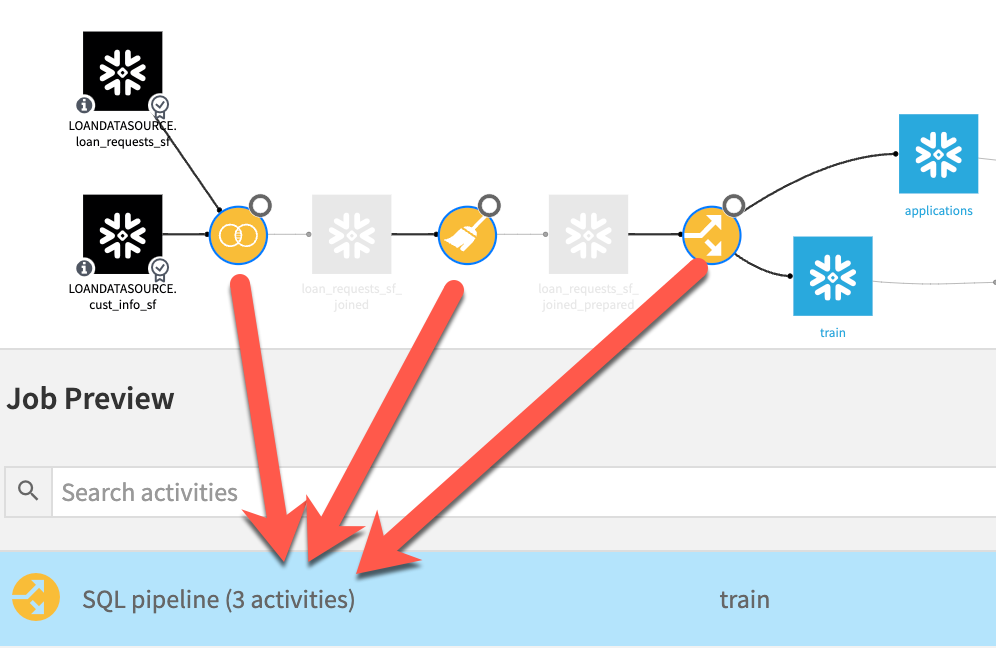
As you can see, the Dataiku job planner has combined our three recipes (activities) into a single SQL pipeline operation. Had we executed this same job without pipelines enabled, we would have seen 3 individual activities listed instead of the combined activity in this example.
By running this job, we can see on the logs that Dataiku, rather than writing out each recipe’s SQL individually, is instead exposing the steps’ output as a new, temporary view created in the Snowflake database. For the “final” datasets that are written in the flow, Dataiku then pulls the transformed data from those intermediate views. See the examples below of SQL statements taken from the Dataiku job logs which illustrate the creation of temporary views by Dataiku to combine the recipes, and then select from that temporary view to insert into the output datasets.
CREATE VIEW "DSSVIEW_LOAN_REQUESTS_SF_JOINED_PREPARED_thVGD" AS <— Creation of a new, temporary view
SELECT
"id",
"Amount_Requested",
"Loan_Purpose",
… [REST OF THE RECIPE LOGIC HERE]
INSERT INTO "APPLICATIONS" <— Inserting data from the temporary view into the output dataset
SELECT
"id" AS "id",
"Amount_Requested" AS "Amount_Requested",
…
"Status" AS "Status"
FROM "DSSVIEW_LOAN_REQUESTS_SF_JOINED_PREPARED_thVGD" "__dku_enriched_input"
Measuring the Results
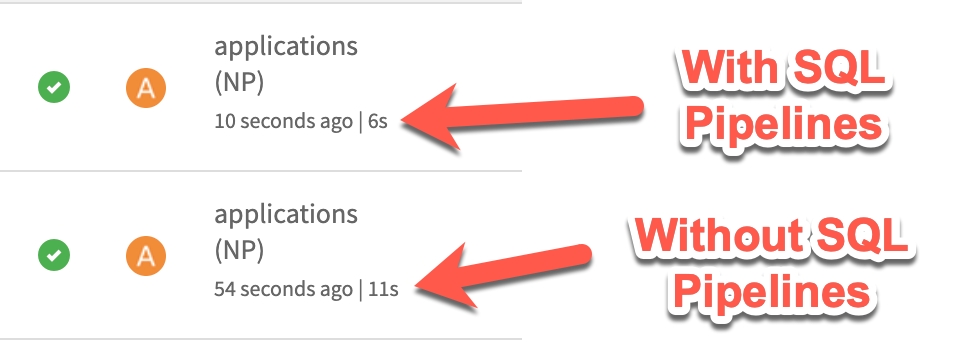
We’ve made the assertion in this article that the use of SQL pipelines along with "Virtualizable" datasets can not only help you reduce your intermediate storage in flows, but also reduce the amount of processing time required to execute complex recipe chains. Although the example we’ve walked through in this article is not a complex chain of recipes, nor are we working with a large amount of data, we can see that the execution time of the same three recipes was reduced from 11s to 6s by enabling pipelines - that’s an 83% decrease! While this may be a simple example and your results may vary depending on the size and complexity of flow and tasks, generally this result should hold true. There is significant time and cost savings to be gained by using SQL pipelines in Snowflake.
Debugging a Flow
We just saw an example of a successful job run using SQL pipelines. However, in the real world, we know that there are often errors encountered in our day-to-day flow execution. In the pros and cons section of this article, we referred to the potential difficulty in debugging a flow that is running using SQL pipelines. As an example of this difficulty, let’s look at what a job execution looks like with a “bug” introduced to our preparation step.
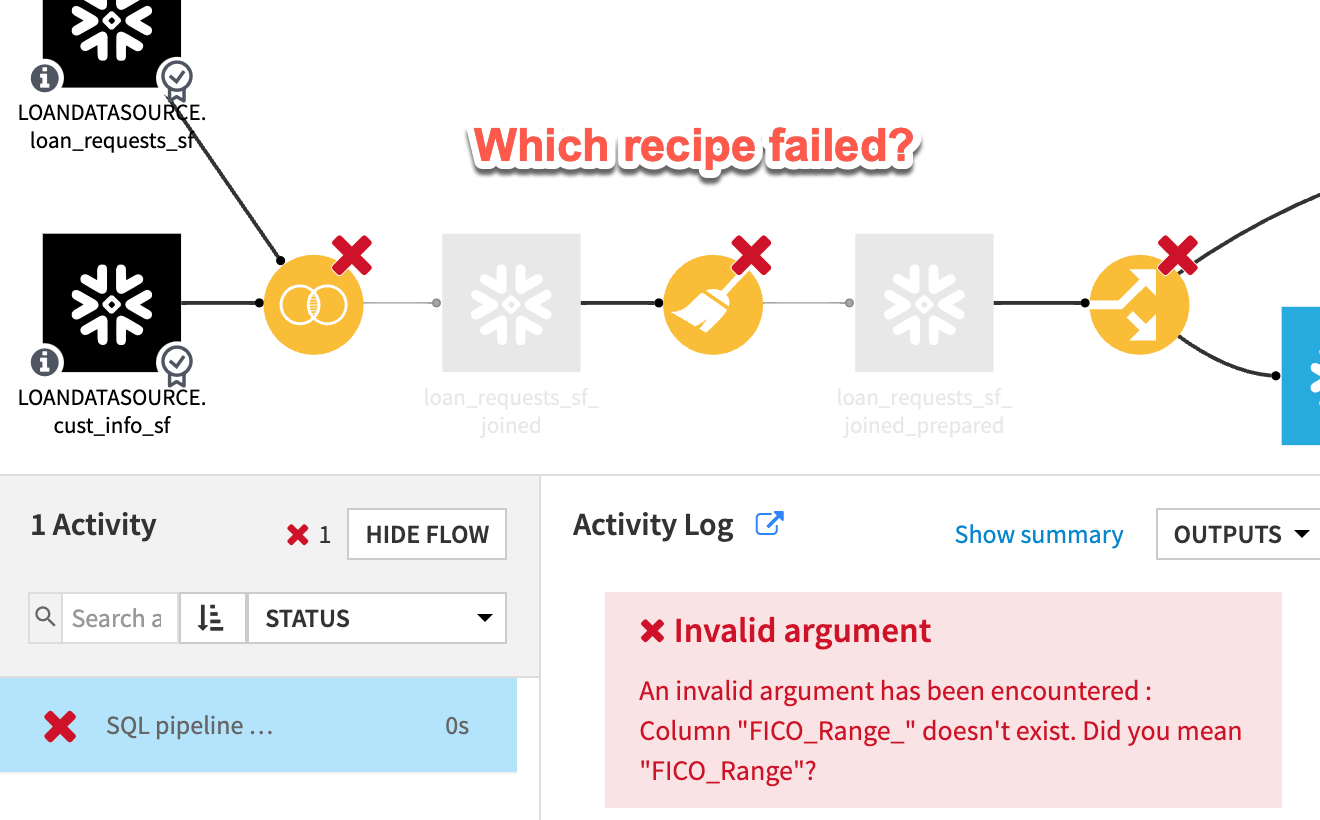
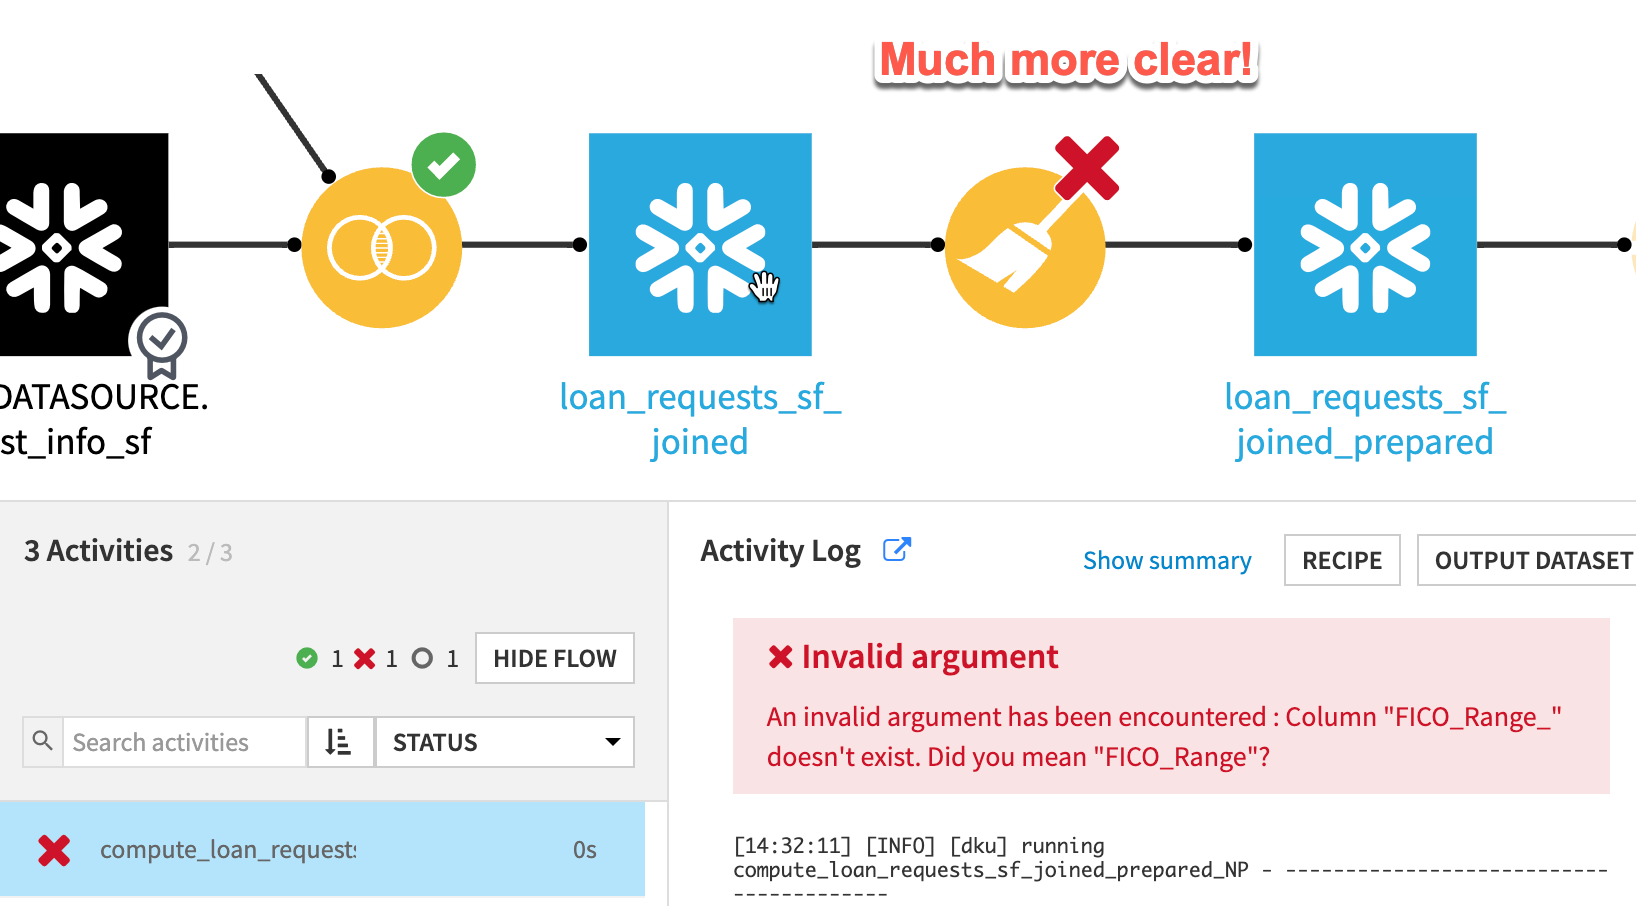
As you can see in the preceding screenshot, our job execution failed and did output a meaningful error statement, but it was unclear which recipe caused the error. Although it is possible to dig through the logs to try to determine the root cause, this is often a difficult task.
An easier way to perform the debugging of this error is to jump back to the "Project Settings", disable SQL pipelines and then retry the job. By simply making this toggle and re-running, it’s possible to get a much clearer view of the problematic recipe and debug/fix the issue.
A Winning Combination
The combination of Dataiku and Snowflake offers a powerful, scalable, and secure solution for managing and analyzing large datasets, enabling organizations to make data-driven decisions faster and more efficiently. A combination that continues to grow in popularity.
In part one of this series, we explored the basic opportunities for optimizing the use of the two platforms. In this article, we’ve covered another, slightly more advanced integration, SQL pipelines. Ready for more? Check our blog page and stay tuned for more best practices in part three of this series- coming soon!