

.jpg?width=300&name=Blank-Template-Blog-Graphics-Header%20(5).jpg)
Over the past several years, an ever-expanding number of organizations are finding that the combination of Snowflake and Dataiku provides a foundation for one of the most flexible and dynamic platforms in the data science and analytics market today. When paired, these two tools can be leveraged to create an exceptionally scalable engine for processing, analyzing, and sharing data. This article covers some of the methods for optimizing Snowflake from your Dataiku platform in order to maximize compute and team efficiency and prepare your projects for successful productionalization.
Using Snowflake as an External Database Resource for Pushdown Computation
If you’ve worked with Dataiku, you may already know that one of the reasons it is an exceptional platform for data science is that it does such a great job as an orchestration engine. Rather than attempting to be a best-of-breed in multiple topics like data storage, processing and ML algorithms, Dataiku instead integrates with the other platforms and libraries in the industry that are well suited for these tasks. This topic specifically applies to Snowflake, since Snowflake is a best-of-breed tool for data storage and processing which we can take advantage of through the DSS platform.
Generally, when we’re referring to the term “pushdown compute”, we’re talking about the ability to process data using an engine other than your Dataiku server. This could be done in a Hadoop or Spark cluster, or in this example, a Snowflake database. More information on the pushdown topic and alternative engines can be found at this link from Dataiku. In this section, we’ll be discussing many of the reasons why pushdown compute is so beneficial and why Snowflake is such a great database to use for pushdown computation.
If you’ve used visual recipes in Dataiku, it’s very likely that you’ve already made use of its pushdown compute capabilities. Anytime you’re using an out-of-the-box Dataiku visual recipe that has an input dataset through a database connection (say MS-SQL or Snowflake) and an output dataset in the same connection, Dataiku will default to pushdown if possible. This means that the processing being performed in your recipe will run in that database instead of using your Dataiku server’s resources to perform the operation.
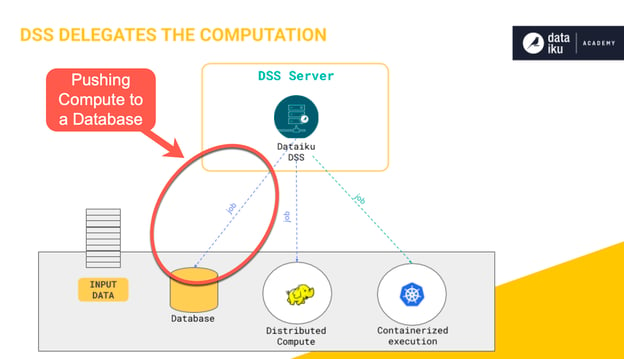
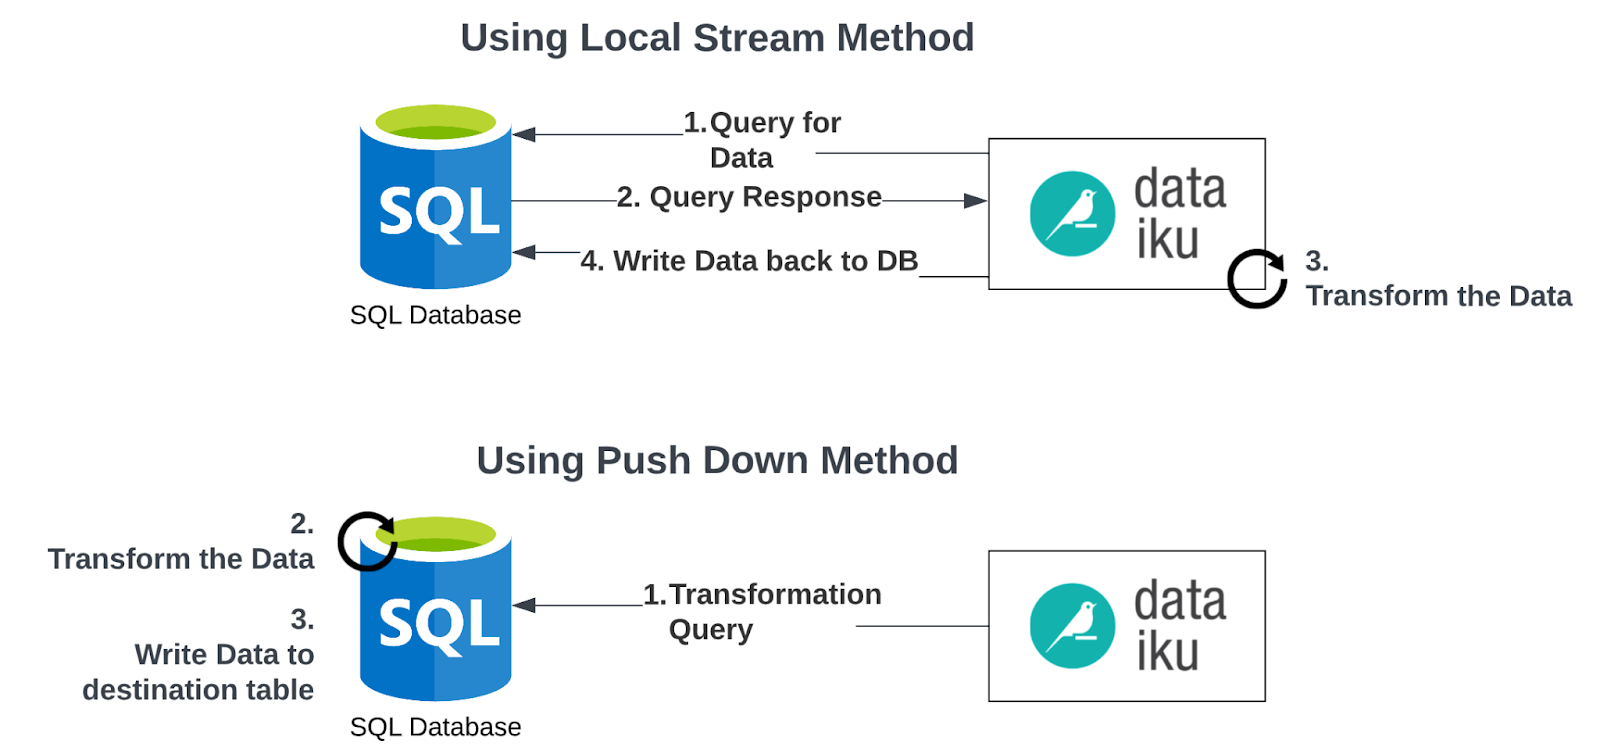
Although it might not seem obvious when you’re working with small datasets, the ability to push the computation of recipes into a database engine like Snowflake can have significant performance implications. When we choose not to push down to a database or other engine (also known as the local stream method), by default, Dataiku will copy the data from a recipe’s input source, perform an operation in-memory, and then write it back to an output destination. We’ll take a look at some of the implications of this, but first, here are a few of the advantages gained by instead pushing this computation into a database like Snowflake:
- Reduced Data Movement: In the case where we don’t push down the processing of a recipe, we’re typically moving data from a source data storage location onto our Dataiku server, performing the processing, and then transferring it back to a destination, likely over a network. This data movement can take a significant amount of time, especially if you have very large datasets. By performing the computation in a database, the data is only moved between tables within the (Snowflake) database, which is exponentially faster and more cost-effective than moving it across a network. This concept aligns with the industry trend of “moving code to the data” rather than “moving data to the code” to improve processing efficiency. This pattern is also utilized in Hadoop / Spark / Databricks ecosystems.
- Data Writes: Depending on what your data destination is, it may take a significant amount of time to write a large amount of data to that storage location. For example, a data warehouse like Azure Synapse or Amazon Redshift are not intended to be performant for bulk inserts, so if we’re performing a recipe that moves a lot of data and uses one of these as an output, the majority of the time taken by the recipe may be for the write back to the destination. By pushing the compute in-database, this write operation is removed completely since the data never leaves the database.
Operation Efficiency: Depending on which recipe you’re executing, it could be much faster to perform that operation in-database as a SQL query. For example, generally databases are very efficient at performing joins, so running this operation in-database will perform much faster than the local stream method which involves pulling the data to your Dataiku server and performing the join there. - Resource Utilization: When a team is logging into a Dataiku Design Node, the internal resources of that server (processor, memory, etc.) are generally shared by all of the team members. If our team is performing computationally heavy operations, these shared resources can become taxed and may reduce the overall performance of our system. By pushing computation to a database engine, we are offloading to a more scalable resource that is optimized for handling many queries running concurrently.
Pushdown Compute Example
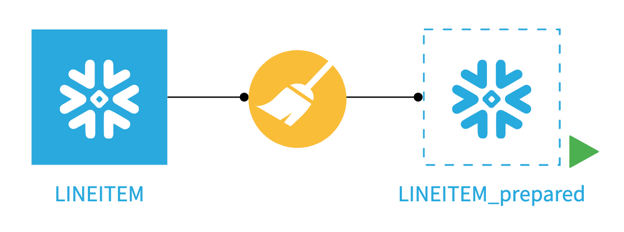
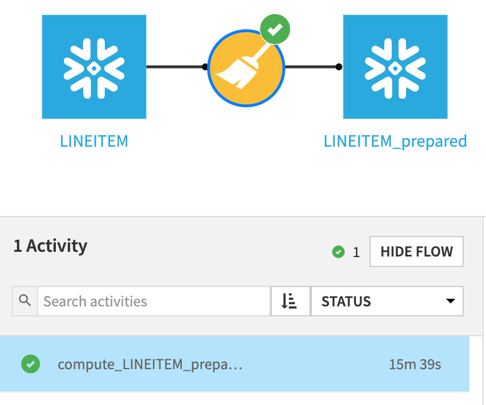
In order to illustrate the difference between running a visual recipe using the local stream method in Dataiku and the “in-database” pushdown compute option, we look at a simple prepare recipe that uses a Snowflake dataset as its input and output. In the screenshots below, the LINEITEM dataset contains about six million rows, and we’re applying a prepare recipe that contains a single formula step.
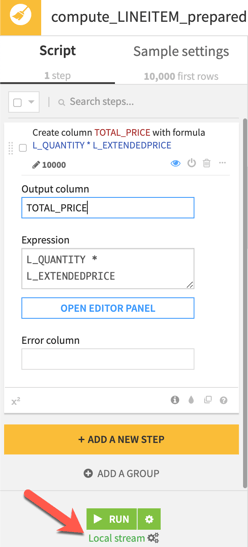
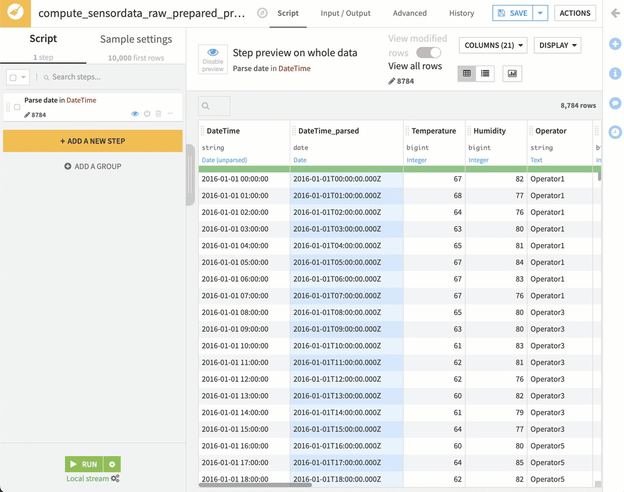
Above you’ll see that the engine selected is listed right below the RUN button. We’ve selected the Local stream option which won’t take advantage of the Snowflake compute resources but instead will perform the computation on the Dataiku server. Running the six million records through this relatively simple prepare recipe in local stream on our Dataiku server resulted in an execution time of nearly 16 minutes, as shown below.
Now, let’s switch from the local stream method to in-database processing to instead run in Snowflake (utilizing pushdown compute). This is done by clicking on the gears below the RUN button as shown below.
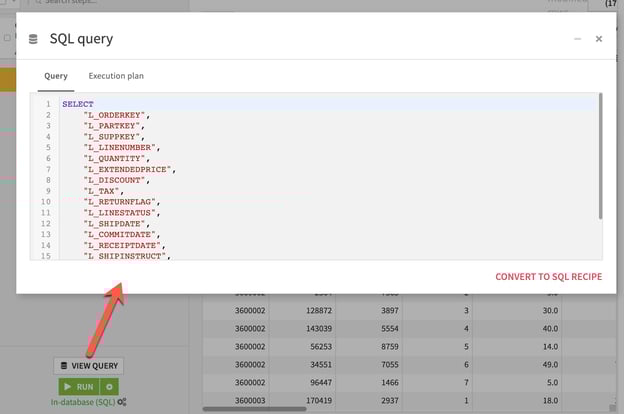
After making this switch, a new VIEW QUERY button now appears above the RUN button, which provides a preview of the SQL query that Dataiku will be generating to execute the steps in Snowflake. Those familiar with lengthy SQL scripts will know that letting Dataiku be responsible for writing and maintaining this query can be a huge time-saving opportunity. Even better, for those who don't know how to write SQL, Dataiku will write and maintain it for you to perform the job.
Now, by clicking RUN, Dataiku will be sending the query to Snowflake and allowing the Snowflake warehouse to execute the preparation transformation. The difference in performance of this execution is pretty staggering:

Our processing went from about 16 minutes down to 10 seconds - that’s 93 times faster!
Of course, this example is just one very specific illustration of the gains you will see by using the pushdown compute method. There are certain recipes and preparation steps that are not possible to translate to SQL queries and therefore not possible to push down into Snowflake. But, if you can be flexible with your preparation steps and are able to push the processing of all of your recipes in a Dataiku project into Snowflake, you’ll likely experience a dramatic increase in the performance of your flow execution, especially for very large datasets. With Snowflake virtual warehouses, it is also very easy to scale compute resources, so as the needs of your team grow, the processing engine can grow with you.
Performance Tip
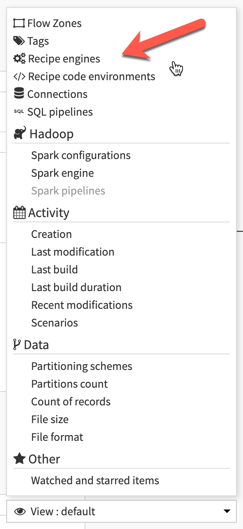
If you have a flow that is taking a long time to execute, check to see which engine each of the recipes is using. If you can move the processing to Snowflake, take advantage of it! It’s also easy to view the engine being utilized by each recipe using the View: Recipe Engines feature in the DSS flow as shown in the image below.
Efficient Use of Snowflake Connections
As we’ve discovered in the previous section, the ability to push the processing of Dataiku recipes into a powerful engine like Snowflake can lead to dramatic improvements in performance. In order to take advantage of this capability, however, we first need to make sure that we’ve optimized the use of the Snowflake connections and datasets within our Dataiku project. In this section, we’ll cover a couple of tips that can help us make the most efficient use of these connections.
Performance Tip: Use the Same Connection
The first tip for enabling the pushdown capabilities of Dataiku and Snowflake actually applies to all database connection types in Dataiku. As mentioned in the previous section, the only way to enable the in-database (SQL) option in Dataiku is when the input and output of a recipe are of the same connection type… but that’s actually misleading. Although we can select the in-database option when using an input and output Snowflake dataset, the pushdown of the computation will only actually run in Snowflake if the two datasets are from the same Dataiku connection. If the datasets are from the same database but with different connections, you’ll see in the job logs that Dataiku actually copies the data first to the server and performs the computation there, and then writes the results back out to the destination. This is essentially the same issue that we were aiming to correct and optimize in the pushdown compute vs local stream section earlier in this article.
This may seem trivial, but if you have multiple Snowflake connections available in your Dataiku instance (for example, each default to a different database), a recipe that reads from an input and writes to an output from a different connection will not run as an in-database query, and you’ll lose the power of the pushdown compute method. Knowing this limitation, in order to optimize your compute, it’s absolutely necessary to keep the input and output datasets on the same connection. Thankfully, there is some flexibility in Dataiku for writing to different destinations with a single connection.
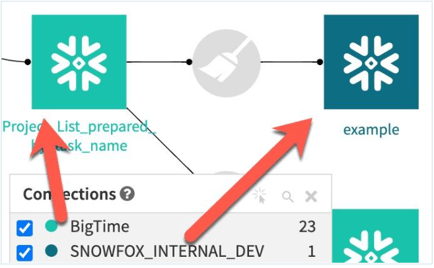
In the above screenshot, we see two datasets that are both utilizing Snowflake connections in Dataiku, but are each using different connections. As previously described, your team may have originally set up multiple connections for the purpose of writing to different Snowflake databases or schemas. In the screenshot example above however, the prepare recipe that writes the example output will, unfortunately, be very inefficient, moving all of the data first to the Dataiku server, and then writing it out to the destination - just like the local stream method illustrated in the previous section.
Performance Tip: Use a Single Connection with Different Parameters
If we wanted to refactor this recipe to be more efficient, one option would be to switch the output dataset to utilize the same connection as the input but change the database and schema properties in the output Dataset “Settings” tab to point to the database/schema that you’d like to write to instead of using a different connection. In the screenshot below, you’ll see that we’re making use of the same database connection as the previous step but have modified the database and schema properties to use a custom (and different) value than the previous dataset. In this example, we’re hard-coding a database and schema, but it’s also possible to make use of a project variable to make this parameter more “dynamic” and maintainable. 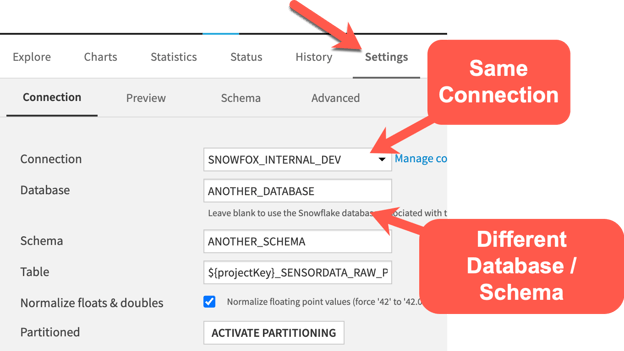
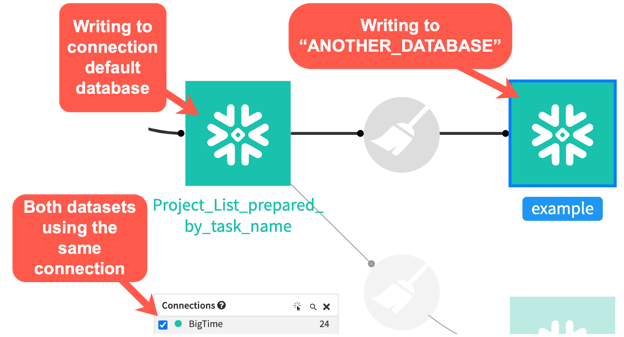
Using this approach, our pushdown capability is now fully realized, with Dataiku running this prepare recipe as a SQL query rather than moving any data off of Snowflake for processing, as depicted in the image below.
In this example, I have made the assumption that the connection uses credentials that have the correct security access to write to ANOTHER_DATABASE / ANOTHER_SCHEMA. This will be an important consideration in your project design.
Optimization Achieved Using Both Dataiku and Snowflake
On their own, both Dataiku and Snowflake are incredible tools for supporting the needs of data science and analytics teams. In combination, it’s possible to achieve a platform that takes advantage of the strengths of each system.
Learn more by visiting our blog and watch for another, more advanced, article showcasing opportunities for Dataiku and Snowflake optimization- coming soon!